doug in nc
Spectator
Safety is key when it comes to racing no matter what type you participate in. There's a number of racing series out there and each require their driver's to adhere to specific rules so it's important to know you have to build in order to be compliant. The purpose of this post is to get information out there and NOT try to apply it to a particular racing series. Please keep this thread on topic dealing with design and fabrication and stay away from anything that might get us off topic or take away from this thread like specific racing series rules. Please feel free to start a new thread and reference portions of this thread if you feel the need. Thanks.
Roll cage design:
Roll cage designs can vary greatly depending on the type of racing. Most of the cage designs you'll run in to at a national level will ALL meet the requirements to keep you safe. However, the biggest thing to remember is that if you want to race with organization X and they have their own rule book, it's the specs in THAT rule book from organization X that you have to build your car to. With that in mind, remember that many organizations allow "Additional Bracing" so you may be able to over-build your car with just a few extra pieces and race with all groups you want.
Tubing:
The most popular material used for roll cage tubing is mild steel. There are also a few different techniques like Aluminum bronze or silicon bronze welding that can be used to as well but special care is required when you use these techniques. I won't pretend to know what I'm talking when it comes to welding so I'll leave this topic open for more knowledgeable folks to fill in the blanks.
Tubing thickness and diameter are important dimensions to take in to account when building your cage. The outside diameter is usually 1.5" but can be up to 2". Pipe thickness or wall thickness is the other dimension that can make or break your cage's legitimacy in your racing series. Some folks will weld a tube in the car somewhere that's not actually in use for anything other than measurement purposes. Other situations require for an inspection hole to be drilled in a non-critical area of tubing. This hole should be done at least 3 inches away from a weld or bend and should be easy to access during a tech inspection. Arrows, text or a circle around the hole would also speed up tech. Read up in your rule book when you're shopping for roll cage tubing and definitely check the MOST RECENT version because you may be able to use smaller piping than last year.
Main Hoop:
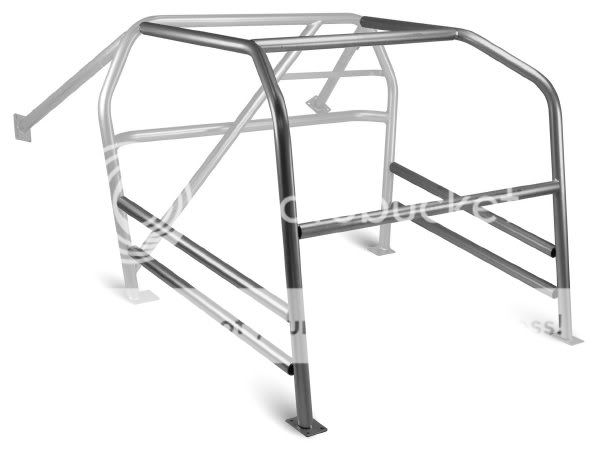
The main hoop is the foundation of a roll cage. This particular design shows a main hoop that is one continuous piece that does not exceed 180 degrees. There is a diagonal brace, a horizontal brace and two rearward braces. Key points to look in to for your build regarding the main hoop are:
1. Mounting points for rear braces (top and bottom)
2. Shape of rear braces
3. Diagonal and Horizontal design (which is required, shape and other details)
4. Overall shape (usually 180 degrees, some allow slight variation)
On the first point, the diagonal rearward braces are used to keep the hoop from shifting fore or aft. There may be tolerances like where the braces mount to the main hoop. Some rule books say as close to the roof line as possible while others may allow them to be a few inches lower. On the opposite of the tube, some rules may require these braces to mount to the floor pan, some to the strut mounts and others may be open for interpretation. Angle of these tubes away from the main hoop may matter too. The closer to straight up and down means the brace doesn't work as hard. If you extend the bars more rearward then it's more difficult for the bar to collapse rearward if you're on your roof. Pay attention to how far back you can go and the angle requirements. Finally, the rules may require that your rearward braces be straight (no bends).
In the case of convertibles and T-Tops, the shoulder mounting point of your factory 3 point seat belt is usually considered the stronger point of the roof line. When rearward bracing is not a choice, additional plates may be required to be welded to the main hoop and bolted to the body. Again, read up and see what's required.
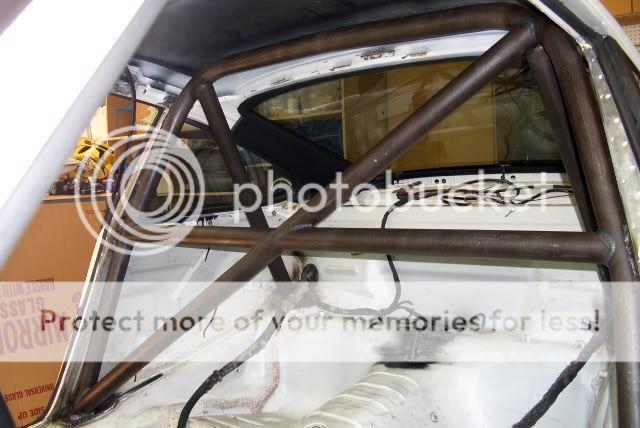
Next point, diagonal and horizontal braces reinforce the main hoop and keep it from distorting when pressure is applied from either a side impact or again if you're on your roof. Depending on the wording of the rules, these two braces for the main hoop may be required to intersect while other requirements allow for them to simply be present. If they are to intersect then the braces should be on the same plain as the main hoop (look from left side of car to the right, you will only see one tube). Also read up to see if which tube is to be a single piece from one end to the other and which can be two pieces.
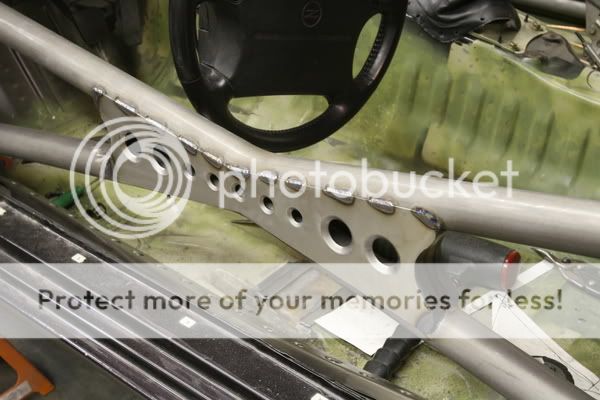
In the picture below, the horizontal brace is bent in such a manor that a diagonal bar cannot possibly intersect. Use of a small tube to "join" these two tubes may be permitted. Frequently, the tubing behind the driver is varied greatly to accept the seat. Additionally, certain rule books may require these two braces to intersect within a range or distance from center. Also, the horizontal bar may be required to be near the driver's shoulders.

This second picture shows the 60/40 (roughly) split union instead of dead center.
The last point of the main hoop is that it's required to be one continuous section of tubing and probably not exceed 180 degrees. The hoop must extend as close to the roof line as possible and be within a matter of inches behind the driver. This obviously puts the cage as close to the driver as possible to provide maximum protection in the event of a roll-over/impact.
On that note, remember that ALL tubing around the driver's head should have padding on it. A helmet is designed to prevent head trauma but that extra layer of padding on the roll bar/caging may make a big difference as well.
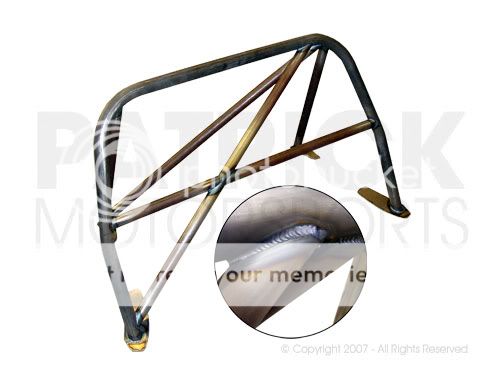
The picture shows a roll bar with additional bracing. it's important to understand that this is NOT a cage even though there are forward braces. However, these additional braces provide minimal driver protection and are there more for the purpose of reinforcing the main hoop. Location of the brace may play a factor in additional protection for the driver however, in the event of a side-impact, the forward brace may get pushed inboard pushing your legs in to the transmission tunnel. It really depends on the angle and severity of the hit as to how much movement this bar may experience.
Front/Side hoop configuration:
There are three types of hoops used to bring the roll cage closer to completion. The first is a Front Hoop configuration which almost mirrors the main hoop located behind the driver. The Front Hoop starts at the driver's foot, goes up the "A-Pillar" to the roof line. It then continues across the windshield and back down to the passenger's outside foot. This tube should be one continuous bar. Two bars should be welded across the top to join the front hoop and the main hoop. Here's a picture of the Front hoop Design:
The next design is a side hoop configuration which uses a continuous bar that starts at the driver's foot, comes up to the windshield/roof and then extends from the "A-Pillar" to the "B-Pillar" behind the driver's head. This is also done on the passenger side of the car. The two "side hoops" should be held in place by a bar that crosses the windshield.
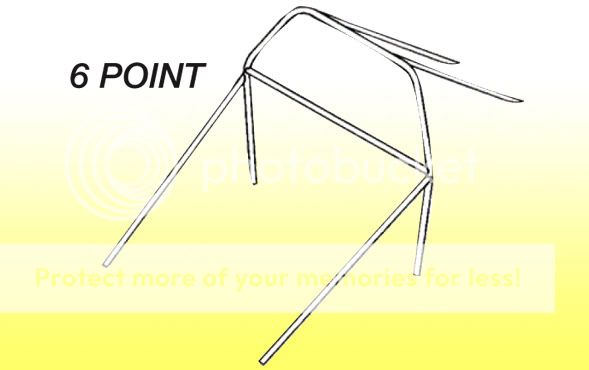
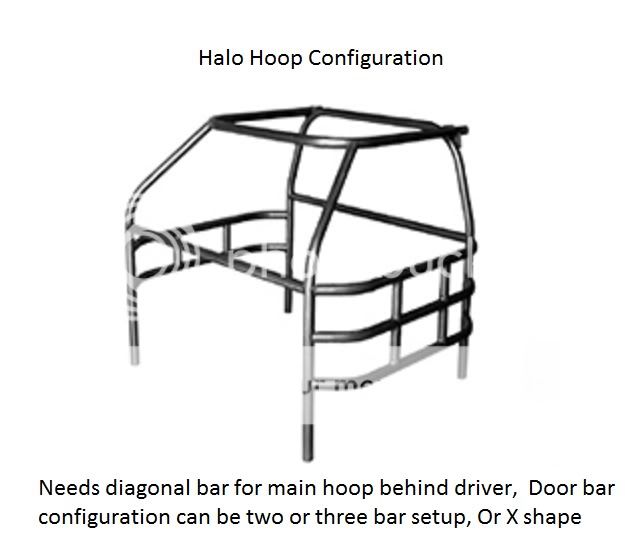
The final design has been pretty popular. It's referred to as a "Halo Hoop" and connects to the main hoop behind the driver at the B-Pillar, goes to the windshield, across to the other A-Pillar and then back to the main hoop on the passenger side B-Pillar. This Halo bar should be one continuous bar. See the picture below:
Side Impact:
There are two designs you'll find in most rule books. The first design uses two bars that run parallel to each other. There's usually a requirement for bars to join these two. Here's an example:
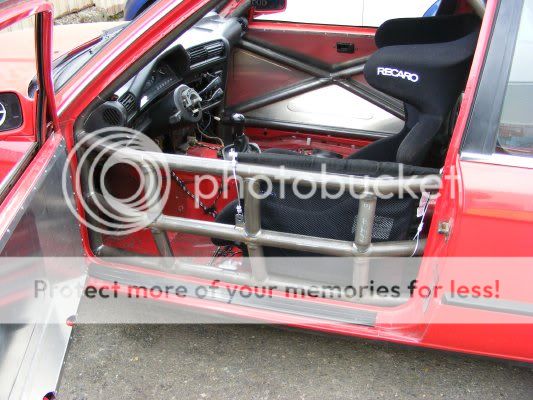
The design above uses three vertical bars to join each door bar. This design also uses three door bars, which may be overkill. However, you may find the rules you're working off of only require one bar or they may refer to a "Nascar Door bar" configuration. If you remove the top most door bar then you're left with one bar more outward than the lower most. This is the Nascar design which makes it easier to get out but also gives the driver a bit more leg room inside the cage. Keep an eye on location of these bars to give you optimal protection against a car running in to you. Also, parallel door bars may create the need for gutting your door shell. This may lead you to the next type of side impact protection.
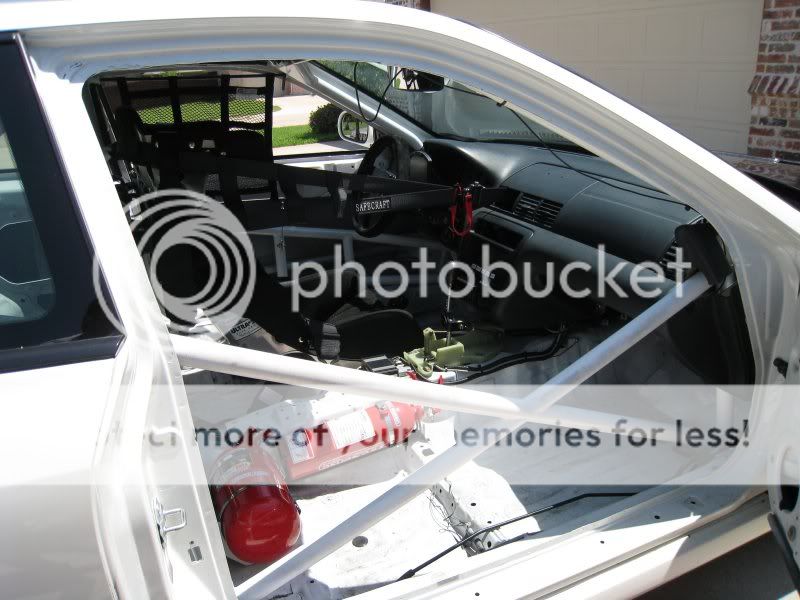
X-Door bars are nice because they don't require gutting of your door panels and the door shell. Make sure that when you make your "X" bars that you pay attention to the wording. Some guys make them so that the two bars actually intersect like this:
Other folks bend two bars together to resemble an "X" but they don't actually intersect and we've even seen some where these bars aren't welded together. Here's an example:
These bars have "Taco Plates" welded to them for additional bracing. Remember, what passed tech last year may not this year. While it's not necessarily an issue of safety, it may be more about what's legal for the racing you're participating in. Make sure you're up to date with your build and if not, make sure your sanctioning body allows you to be grandfathered in with your build.
If you wish to add to this thread, I welcome additional insight that can help others build a good cage or roll bar. Areas that could use some clarification would include tubing composition and welding technique. I REALLY encourage the use of pictures and links when you respond. It helps explain things better but also makes it clear you're not just sharing an opinion, you've got documentation supporting your thoughts.
Finally, I can't stress enough to make sure your build meets the requirements for the series you want to run with regardless of what is acceptable for other sanctioning bodies. When it comes to stiff competition, if the driver next to you can't win based on performance, they may protest your legitimacy all together and a gray area may cost you the win.
Thanks,
Doug
Roll cage design:
Roll cage designs can vary greatly depending on the type of racing. Most of the cage designs you'll run in to at a national level will ALL meet the requirements to keep you safe. However, the biggest thing to remember is that if you want to race with organization X and they have their own rule book, it's the specs in THAT rule book from organization X that you have to build your car to. With that in mind, remember that many organizations allow "Additional Bracing" so you may be able to over-build your car with just a few extra pieces and race with all groups you want.
Tubing:
The most popular material used for roll cage tubing is mild steel. There are also a few different techniques like Aluminum bronze or silicon bronze welding that can be used to as well but special care is required when you use these techniques. I won't pretend to know what I'm talking when it comes to welding so I'll leave this topic open for more knowledgeable folks to fill in the blanks.
Tubing thickness and diameter are important dimensions to take in to account when building your cage. The outside diameter is usually 1.5" but can be up to 2". Pipe thickness or wall thickness is the other dimension that can make or break your cage's legitimacy in your racing series. Some folks will weld a tube in the car somewhere that's not actually in use for anything other than measurement purposes. Other situations require for an inspection hole to be drilled in a non-critical area of tubing. This hole should be done at least 3 inches away from a weld or bend and should be easy to access during a tech inspection. Arrows, text or a circle around the hole would also speed up tech. Read up in your rule book when you're shopping for roll cage tubing and definitely check the MOST RECENT version because you may be able to use smaller piping than last year.
Main Hoop:
The main hoop is the foundation of a roll cage. This particular design shows a main hoop that is one continuous piece that does not exceed 180 degrees. There is a diagonal brace, a horizontal brace and two rearward braces. Key points to look in to for your build regarding the main hoop are:
1. Mounting points for rear braces (top and bottom)
2. Shape of rear braces
3. Diagonal and Horizontal design (which is required, shape and other details)
4. Overall shape (usually 180 degrees, some allow slight variation)
On the first point, the diagonal rearward braces are used to keep the hoop from shifting fore or aft. There may be tolerances like where the braces mount to the main hoop. Some rule books say as close to the roof line as possible while others may allow them to be a few inches lower. On the opposite of the tube, some rules may require these braces to mount to the floor pan, some to the strut mounts and others may be open for interpretation. Angle of these tubes away from the main hoop may matter too. The closer to straight up and down means the brace doesn't work as hard. If you extend the bars more rearward then it's more difficult for the bar to collapse rearward if you're on your roof. Pay attention to how far back you can go and the angle requirements. Finally, the rules may require that your rearward braces be straight (no bends).
In the case of convertibles and T-Tops, the shoulder mounting point of your factory 3 point seat belt is usually considered the stronger point of the roof line. When rearward bracing is not a choice, additional plates may be required to be welded to the main hoop and bolted to the body. Again, read up and see what's required.
Next point, diagonal and horizontal braces reinforce the main hoop and keep it from distorting when pressure is applied from either a side impact or again if you're on your roof. Depending on the wording of the rules, these two braces for the main hoop may be required to intersect while other requirements allow for them to simply be present. If they are to intersect then the braces should be on the same plain as the main hoop (look from left side of car to the right, you will only see one tube). Also read up to see if which tube is to be a single piece from one end to the other and which can be two pieces.
In the picture below, the horizontal brace is bent in such a manor that a diagonal bar cannot possibly intersect. Use of a small tube to "join" these two tubes may be permitted. Frequently, the tubing behind the driver is varied greatly to accept the seat. Additionally, certain rule books may require these two braces to intersect within a range or distance from center. Also, the horizontal bar may be required to be near the driver's shoulders.
This second picture shows the 60/40 (roughly) split union instead of dead center.
The last point of the main hoop is that it's required to be one continuous section of tubing and probably not exceed 180 degrees. The hoop must extend as close to the roof line as possible and be within a matter of inches behind the driver. This obviously puts the cage as close to the driver as possible to provide maximum protection in the event of a roll-over/impact.
On that note, remember that ALL tubing around the driver's head should have padding on it. A helmet is designed to prevent head trauma but that extra layer of padding on the roll bar/caging may make a big difference as well.
The picture shows a roll bar with additional bracing. it's important to understand that this is NOT a cage even though there are forward braces. However, these additional braces provide minimal driver protection and are there more for the purpose of reinforcing the main hoop. Location of the brace may play a factor in additional protection for the driver however, in the event of a side-impact, the forward brace may get pushed inboard pushing your legs in to the transmission tunnel. It really depends on the angle and severity of the hit as to how much movement this bar may experience.
Front/Side hoop configuration:
There are three types of hoops used to bring the roll cage closer to completion. The first is a Front Hoop configuration which almost mirrors the main hoop located behind the driver. The Front Hoop starts at the driver's foot, goes up the "A-Pillar" to the roof line. It then continues across the windshield and back down to the passenger's outside foot. This tube should be one continuous bar. Two bars should be welded across the top to join the front hoop and the main hoop. Here's a picture of the Front hoop Design:
The next design is a side hoop configuration which uses a continuous bar that starts at the driver's foot, comes up to the windshield/roof and then extends from the "A-Pillar" to the "B-Pillar" behind the driver's head. This is also done on the passenger side of the car. The two "side hoops" should be held in place by a bar that crosses the windshield.
The final design has been pretty popular. It's referred to as a "Halo Hoop" and connects to the main hoop behind the driver at the B-Pillar, goes to the windshield, across to the other A-Pillar and then back to the main hoop on the passenger side B-Pillar. This Halo bar should be one continuous bar. See the picture below:
Side Impact:
There are two designs you'll find in most rule books. The first design uses two bars that run parallel to each other. There's usually a requirement for bars to join these two. Here's an example:
The design above uses three vertical bars to join each door bar. This design also uses three door bars, which may be overkill. However, you may find the rules you're working off of only require one bar or they may refer to a "Nascar Door bar" configuration. If you remove the top most door bar then you're left with one bar more outward than the lower most. This is the Nascar design which makes it easier to get out but also gives the driver a bit more leg room inside the cage. Keep an eye on location of these bars to give you optimal protection against a car running in to you. Also, parallel door bars may create the need for gutting your door shell. This may lead you to the next type of side impact protection.
X-Door bars are nice because they don't require gutting of your door panels and the door shell. Make sure that when you make your "X" bars that you pay attention to the wording. Some guys make them so that the two bars actually intersect like this:
Other folks bend two bars together to resemble an "X" but they don't actually intersect and we've even seen some where these bars aren't welded together. Here's an example:
These bars have "Taco Plates" welded to them for additional bracing. Remember, what passed tech last year may not this year. While it's not necessarily an issue of safety, it may be more about what's legal for the racing you're participating in. Make sure you're up to date with your build and if not, make sure your sanctioning body allows you to be grandfathered in with your build.
If you wish to add to this thread, I welcome additional insight that can help others build a good cage or roll bar. Areas that could use some clarification would include tubing composition and welding technique. I REALLY encourage the use of pictures and links when you respond. It helps explain things better but also makes it clear you're not just sharing an opinion, you've got documentation supporting your thoughts.
Finally, I can't stress enough to make sure your build meets the requirements for the series you want to run with regardless of what is acceptable for other sanctioning bodies. When it comes to stiff competition, if the driver next to you can't win based on performance, they may protest your legitimacy all together and a gray area may cost you the win.
Thanks,
Doug